
Click Here to receive your own Brisket Checklist
Brisket....OH MY GOODNESS Brisket. It is literally my favorite cut of meat to cook and to eat. It is one of the more difficult pieces of meat to get right! I prefer to cook full packer briskets over just the flat or the point. I feel by cooking it as one big hunk of beef that the fat in the point helps to keep the flat nice and juicy.
There are many things to consider when cooking your first brisket. How to choose one at the market or butcher, what fuel source will you be using, rub - sauce - braise combo, etc. Here is a step by step break down with tips and tricks to help you master you first brisket.
1. The brisket – how to select, properly trim and add a rub to your brisket
The problem most people have with brisket is that it’s a tough cut of meat. This makes it perfect for low & slow cooking.
Great brisket isn’t about fancy rubs, mops, marinades or BBQ sauce.
Selecting the the right brisket from the butcher shop and preparing it properly will set you up for success well before you even fire up your smoker.
Tips for Selecting a Brisket
While some people swear you need to buy Wagyu brisket, for practice cooks it’s fine to buy your brisket from places like Costco, Sams Club or asking your local butcher. Sometimes I will even get luck and score a Prime Brisket at my local grocery store. The grocery stores often grind briskets in ground beef.
If you want to go straight to the good stuff, Snake River Farms sells top-quality American Wagyu brisket and deliver everywhere in the continental United States.
- We recommend buying a whole packer brisket, which lets you have full control over the trimming process.
- When selecting your brisket look for marbling in the meat and a thick flat so the leaner part will cook at almost the same rate as the larger point.
- Look for USDA Choice, Prime or Certified Angus Beef

How to Trim a Brisket
- Use a good stiff boning knife for trimming the brisket.
- If you don’t trim any fat off the brisket it will taste too fatty, but trimming too much will make your brisket dry. Aim for around 1/4″ of fat.
- Brisket is much easier to trim when it’s still cold so trim it right after you take it out of the fridge.
- There is a thick membrane called the deckle that will not render out during cooking, you will you need to cut out (some butchers will have done this for you)

- Trim off any bits which are significantly thinner than the rest as they will cook too fast and burn.
- Think about where the heat will be coming from and how the brisket will be placed on your cooking surface. Areas that run hotter can have a little more fat to help protect the meat.
- So long as you leave around 1/4″ of fat and get a good shape don’t worry too much about trimming. Practice makes perfect.
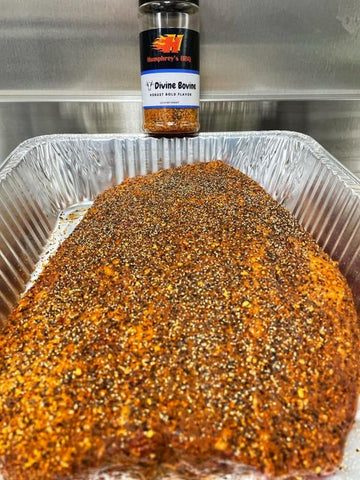
Barbecue Brisket Rub
A lot of people use complicated rubs with chill powder, cumin and paprika on their brisket.
For true Texas style brisket you want to use even parts salt & black pepper. This simple style rub will still give you a great bark, while still letting the beef flavor dominate.
If you are looking for a Brisket rub that is a bit more complex but still allows the beef to shine then I suggest Humphrey's Devine Bovine. This rub has assisted many competition BBQ teams to a first place brisket!
2. The cook – how to manage the fire and treat the brisket while it’s cooking
No matter if you use a Weber Smokey Mountain, Kamado, Vertical Cabinet, Offset smoker or use wood, charcoal or propane you can still master your brisket cook. Knowing how your smoker operates will give you much success in smoking your first brisket.
Positioning the brisket on your smoker
Fat side up vs fast side down is a surprisingly controversial topic. While how much this actually matters is up for debate, the right way depends on your smoker setup.
- When using a vertical cabinet like Humphrey's Smokers we suggest putting your brisket fat side up to allow the fat to render down through the meat.
- Depending on your smoker, if the heat is coming from below, consider smoking fat-side down to protect the muscle from drying out too much.
- Place the fattier point of the brisket closer to the fire. The extra fat will help insulate it.
- The flat end of the brisket should be closer to the smoke stack.
- Using a water pan to help keep moisture in the cooking chamber and avoid burning or creating an extremely thick bark.
How long to cook brisket
Ask any experienced pit master how long to cook a brisket and they’ll roll their eyes and tell you to cook until it probes tender.
Two similar sized briskets can have very different cook times based on a number of factors.
- Thickness and Diameter
- How much fat content there is
- How hot is the cooking temp
- The weather and Humidity level
- The type of smoker you are using
- Altitude
- Wrapping (Texas crutch) or not wrapping
- A good rule of thumb for working out how long a brisket will take to cook is 1 hour and 15 minutes per LB (0.45kg) of brisket at 250°F (120°C).
For example: 10lb Brisket x 1.25 hours = 12.5 hours cooked at 250°F.
You can also cook a brisket hot and fast and finish it in less time, and still get great results so give that method a try if you are short on time. We will discuss this method in another blog entry.
Managing your brisket during the cook
To ensure a steady temperature and avoid opening the lid too often, make sure you have a quality wireless thermometer setup with dual probes so you can measure the temperature of the smoker, as well as the internal meat temp.
- Try and avoid choking off the oxygen too much which can cause a ‘dirty fire’. This can create creosote (a thick, oily substance left over by fire) which causes a bitter, oversmoked taste.
- Wood choice for brisket is important, so try and avoid green wood or overly cured wood. My favorite species for brisket is oak, maple, or pecan.
- You want to see clean heat coming out of the smoker and not a lot of smoke.
- Knowing your cooker and how to manage your fire only comes from a lot of experience so try and maintain an even temperature but don’t freak out if you don’t get it perfect on your first brisket.

How to Keep Your Brisket Moist
- Keeping a water pan in the smoker is the best way to retain moisture.
- After the first 2-3 hours start spritzing your brisket with water, apple juice, hot sauce or apple cider vinegar every 30 minutes to an hour. This helps keep it moist and stops it from burning.
- Some people use a liquid mixture to mop the meat but this causes a bunch of mess and can interfere with the bark on the brisket.
- Keep in mind that using too much moisture may make for a soggy bark. So if you are looking for a firmer bark omit the mopping and spritzing steps. Maybe instead, inject your brisket 3-6 hours prior to cooking. This will help to keep the internal meat moist while creating a nice bark.
Wrapping your brisket and dealing with the dreaded stall:
- Wrapping the brisket in foil (the Texas Crutch) or butcher paper is an optional step that can help you in some circumstances.
- It can help the brisket retain moisture push through the stall faster.
- If your smoker is giving off too much smoke wrapping can also help.
- Wrapping in foil can help accelerate the cook time if your guests are getting impatient.
- You can wrap the brisket after around 4-6 hours or you can cook for 11 or 12 hours and never need to wrap it. It all comes down to fire management and personal preference.
- When the internal temperature of your brisket hits around 150°F -170°F the temperature can stall as the brisket tightens up and squeezes out moisture. Patience is key.
- Adding a braise to the foil pack can contribute to a moister brisket.
- Once wrapped, put the brisket back on at 250°F until done. We recommend using one of the leave-in thermometer reviewed here, and taking it off when it’s at an internal temperature of 195-203°F.
- When the meat probes like butta'h! I best determine when a brisket is done by inserting a meat probe into the point and when it slides in like butter is when I consider it done.

Slicing your brisket
- Once you’ve taken the brisket off the cooker and let it rest for about an hour you are ready to slice. Vent out the steam (prevents the brisket from over cooking) then wrap back up in the foil and place into a cooler lined with towels.
- The proper way to slice a brisket is to cut against the grain on the flat side until you get to the point. And then turn the brisket 90 degrees and then cut against the grain. This is the make it or break it in creating a tender slice. The grain doesn't necessarily run side to side of the piece of meat but might run at an angle.
- Try and avoid scraping off the bark.
- Use a 12″ wide hollow beef slicer
- Cut each slice around the thickness of a big pencil on the fattier part and a small pencil on the leaner part.
How to slice a brisket: a step-by-step guide
Now we’ve got our brisket knife, our well-rested hunk of meat, and something substantial and secure to cut it on, it’s time to get slicing.
Remember, if you’re not planning to eat this brisket in one sitting, don’t pre-slice it. Only slice off what you’re eating today and leave the rest whole. This will help to keep it moist for longer.
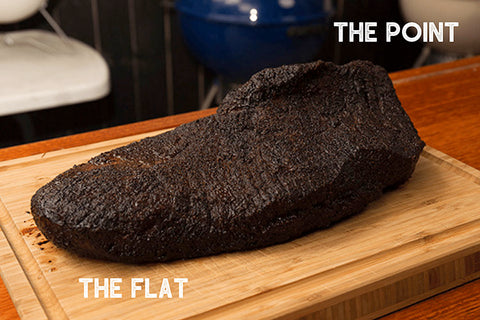
1. Separate the flat from the point
The key to slicing any piece of meat and retaining its tender juiciness is to slice against the grain. This cuts through the muscle fibers, shortening them and making the meat seem more tender by giving you less to chew through.
The point and the flat of the brisket have fibers that run in two different directions, so the first step to slicing you brisket it cutting it in half to separate the flat from the point.
2. Trim excess fat (unless your brisket was perfectly trimmed before cooking)
Fat does mean flavor, but too much fat can make your brisket seem greasy. After you’ve separated the point from the flat, trim any excess fat you can see from the top of your brisket.
3. Remove the tip
The tip of the brisket is the smallest part of the cut and is most often slightly overcooked because of that. The best thing to do with the tip is to slice it off, chop it up and serve it as burnt ends.
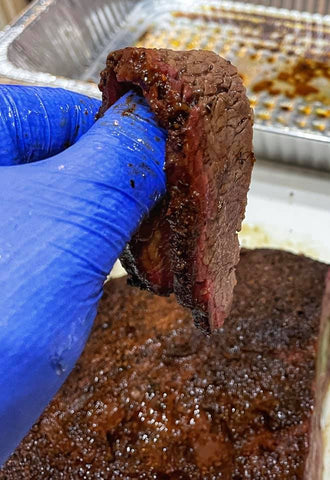
When a slice of brisket flat will bend over your finger it has the perfect tenderness.
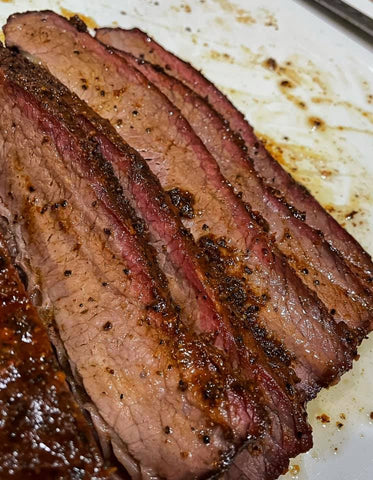
4. Slice the flat
Now comes the time to start properly slicing your brisket. First, slice the flat of your brisket.
You’re looking for long, smooth strokes of the knife that yield slice about the thickness of a pencil.
5. Slice the point
Once the flat is sliced, take your brisket point section and cut it in half lengthwise. This helps to avoid you ending up with the tiny little slices you’d get if you cut widthwise towards the point.
As with the flat, you’re going to want to cut against the grain of the meat. The grain in the point runs in a different direction to the flat, so take your time, find the grain, and make sure to cut across it.
Once that’s all done, you should have a whole mess of beautifully juicy, sliced brisket and a small selection of chewy, crispy brunt ends.
Now it's time to sit back and enjoy your labor of love!
Brisket is great on it's own, in a bun with a scoop of slaw drilled with some smoky BBQ sauce or in many other dishes. We will be compiling a list of great recipes to use with your leftover brisket.
Humphrey's BBQ is supported by its readers. We may earn an affiliate commission at no extra cost to you if you buy through a link on this page.
Source: Smoked BBQ Source